IAM
Getting Started
To create users, policy and user groups in IAM, you just need to follow very simple steps. All you need to do is just few clicks. You can find the details below to add a user and groups.
Steps:
- Create User
- Create Group and Add User to Group
- Create Policy and Add Policy to Group
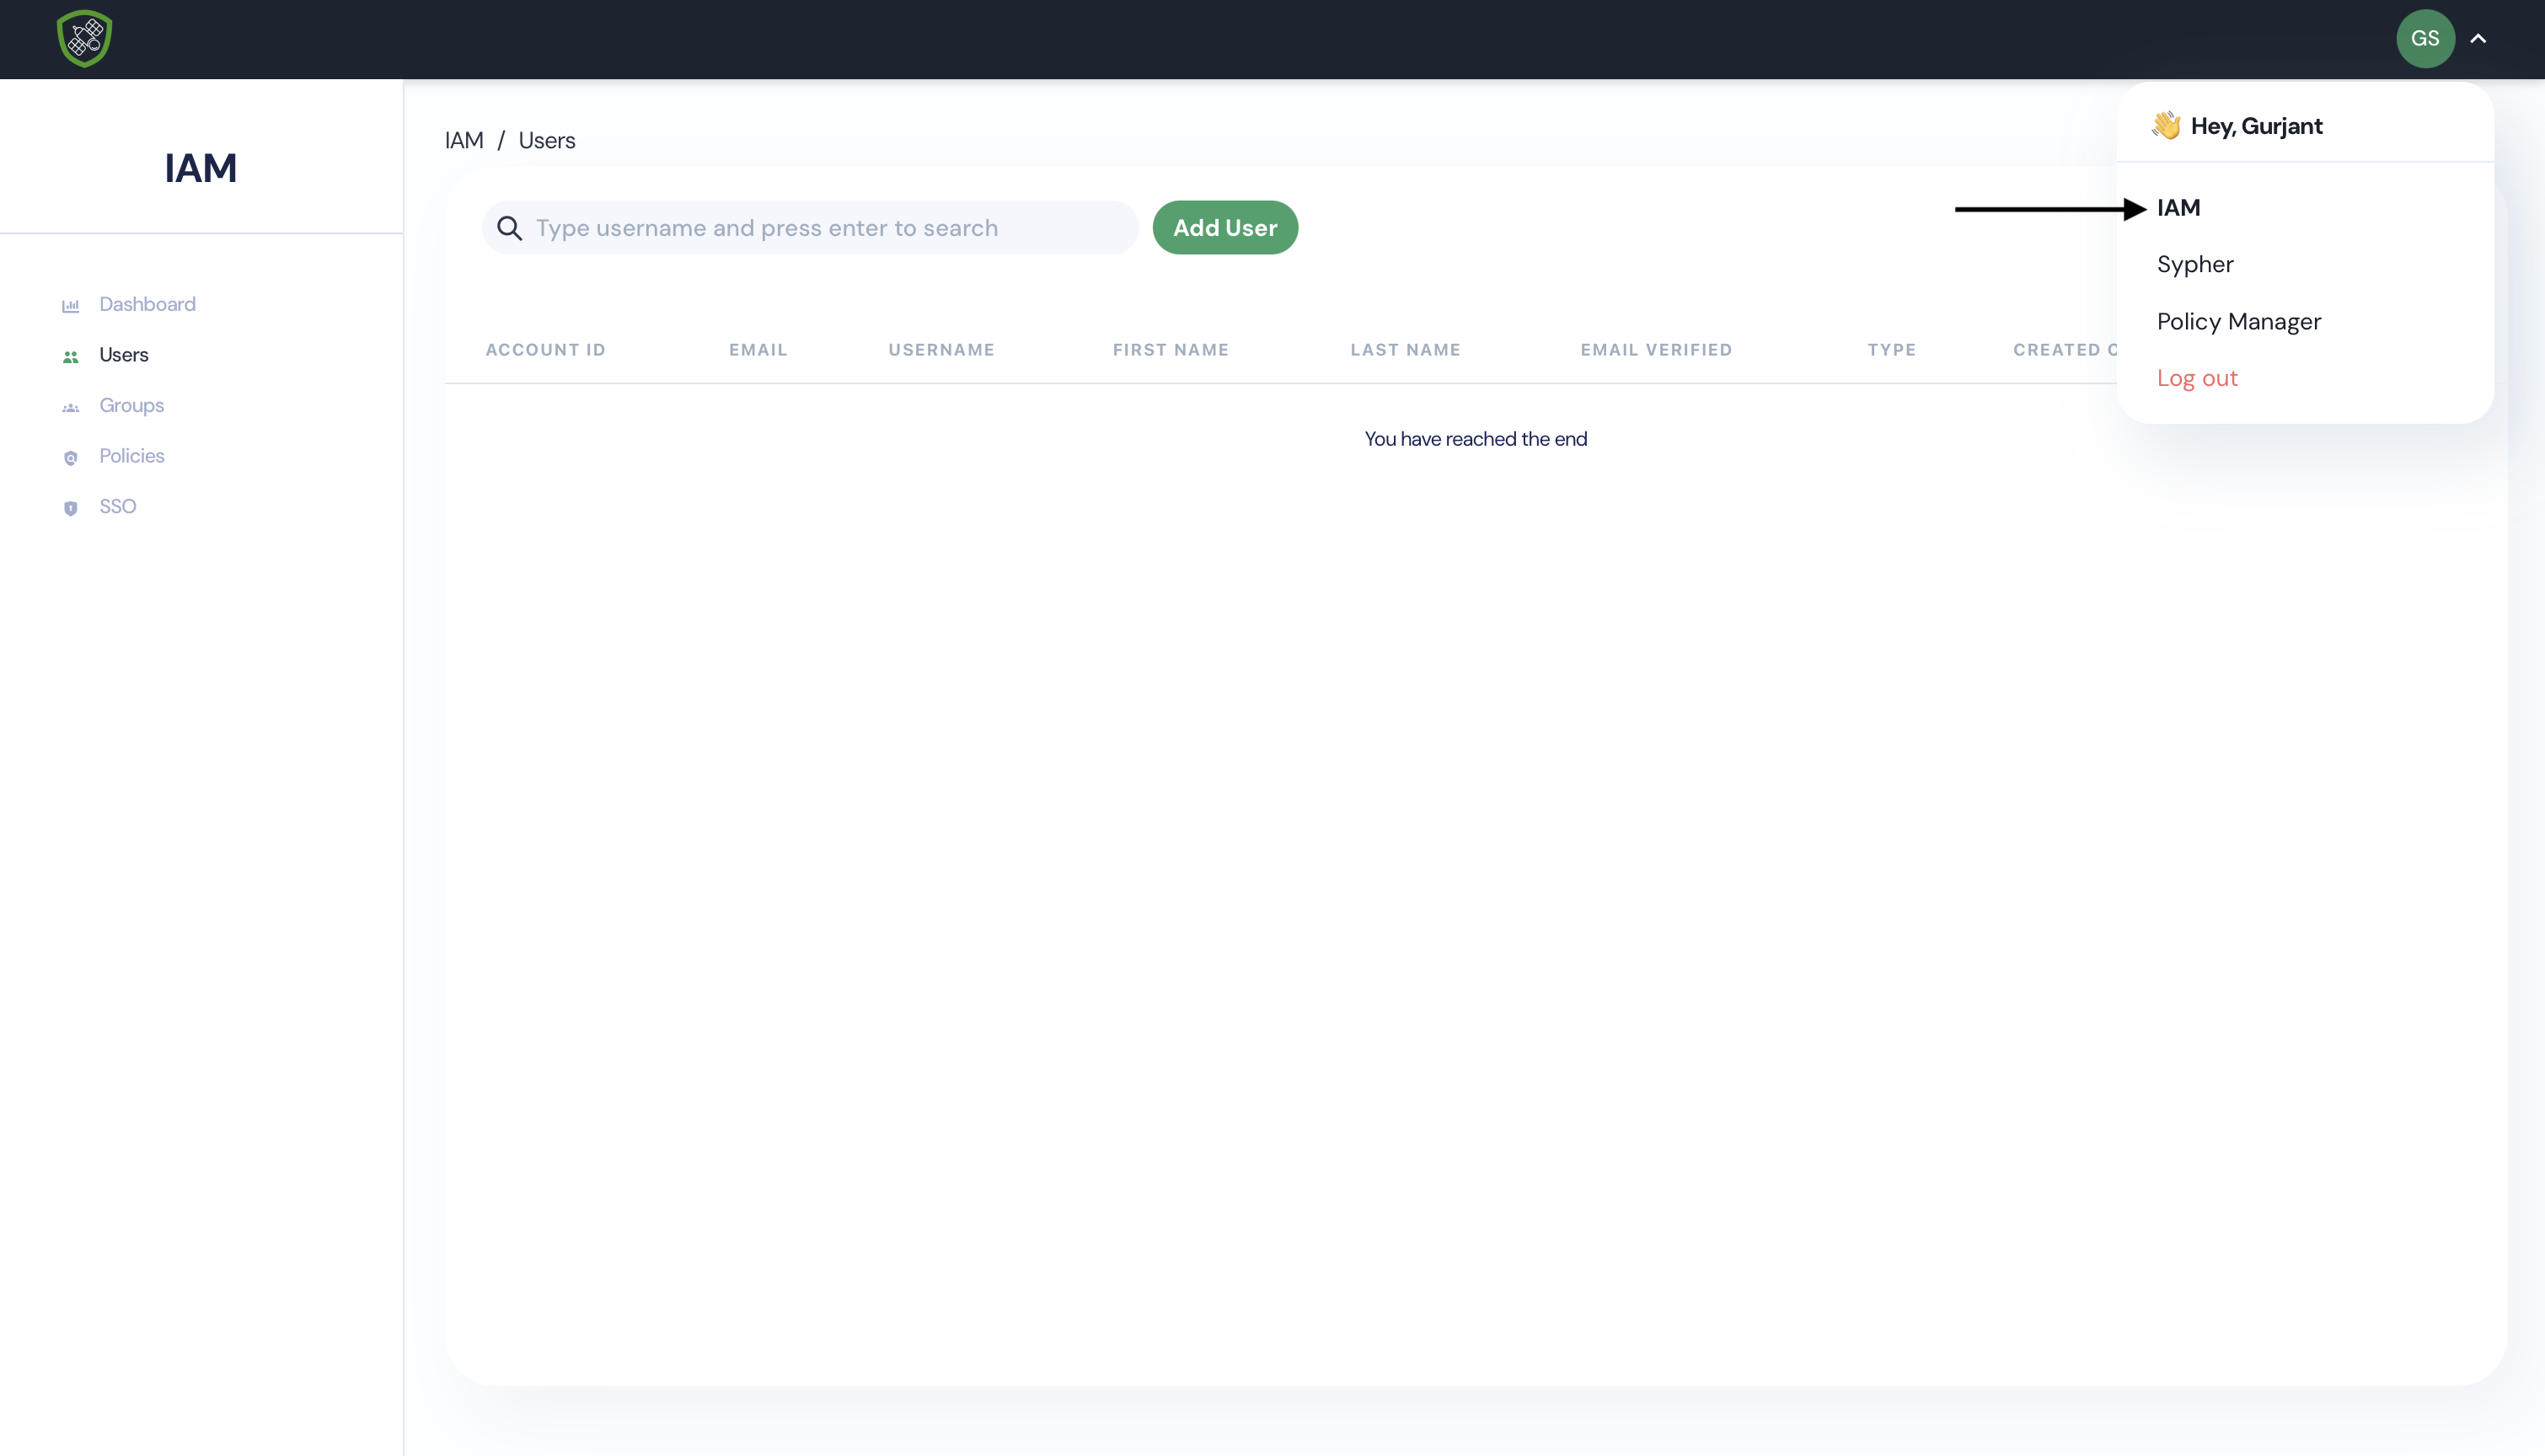
Go To IAM
- Click on IAM from user dropdown menu.
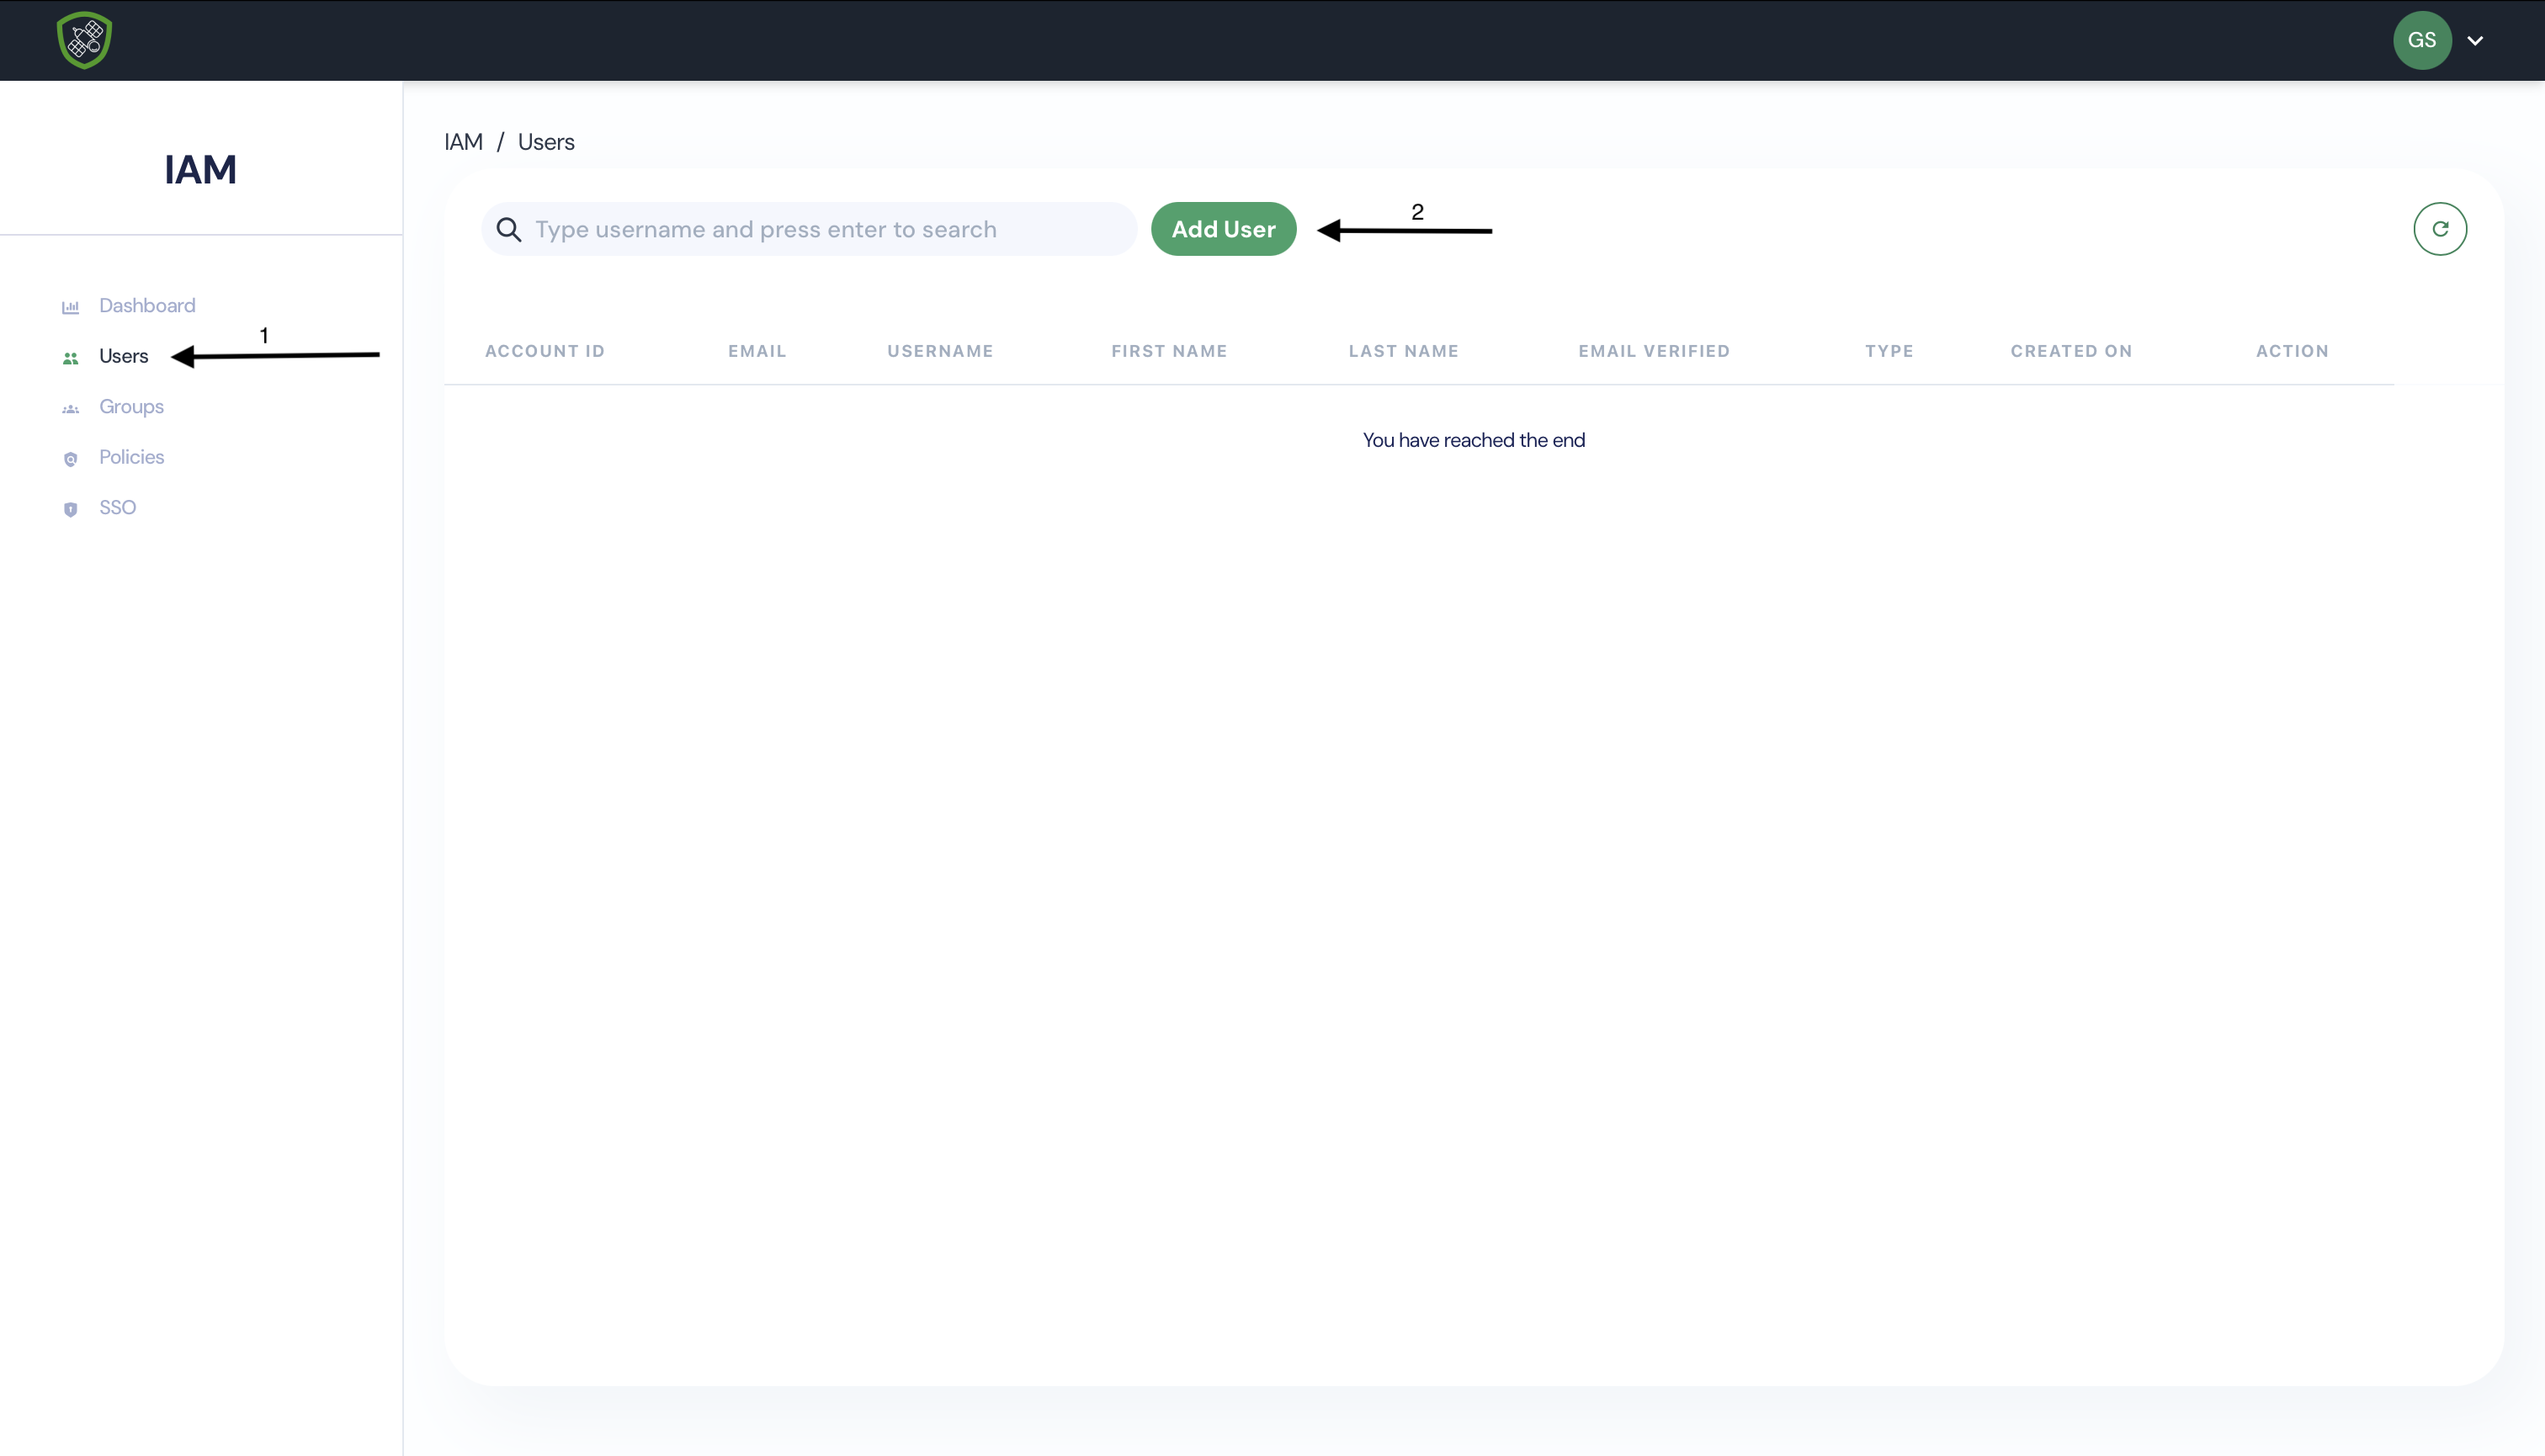
Create your first IAM User
- Click on Users then Add User button.
- Provide a username and select Access Type.
- Management Access: Login to Web application.
- Progromatic Access: For CLI/API calls.
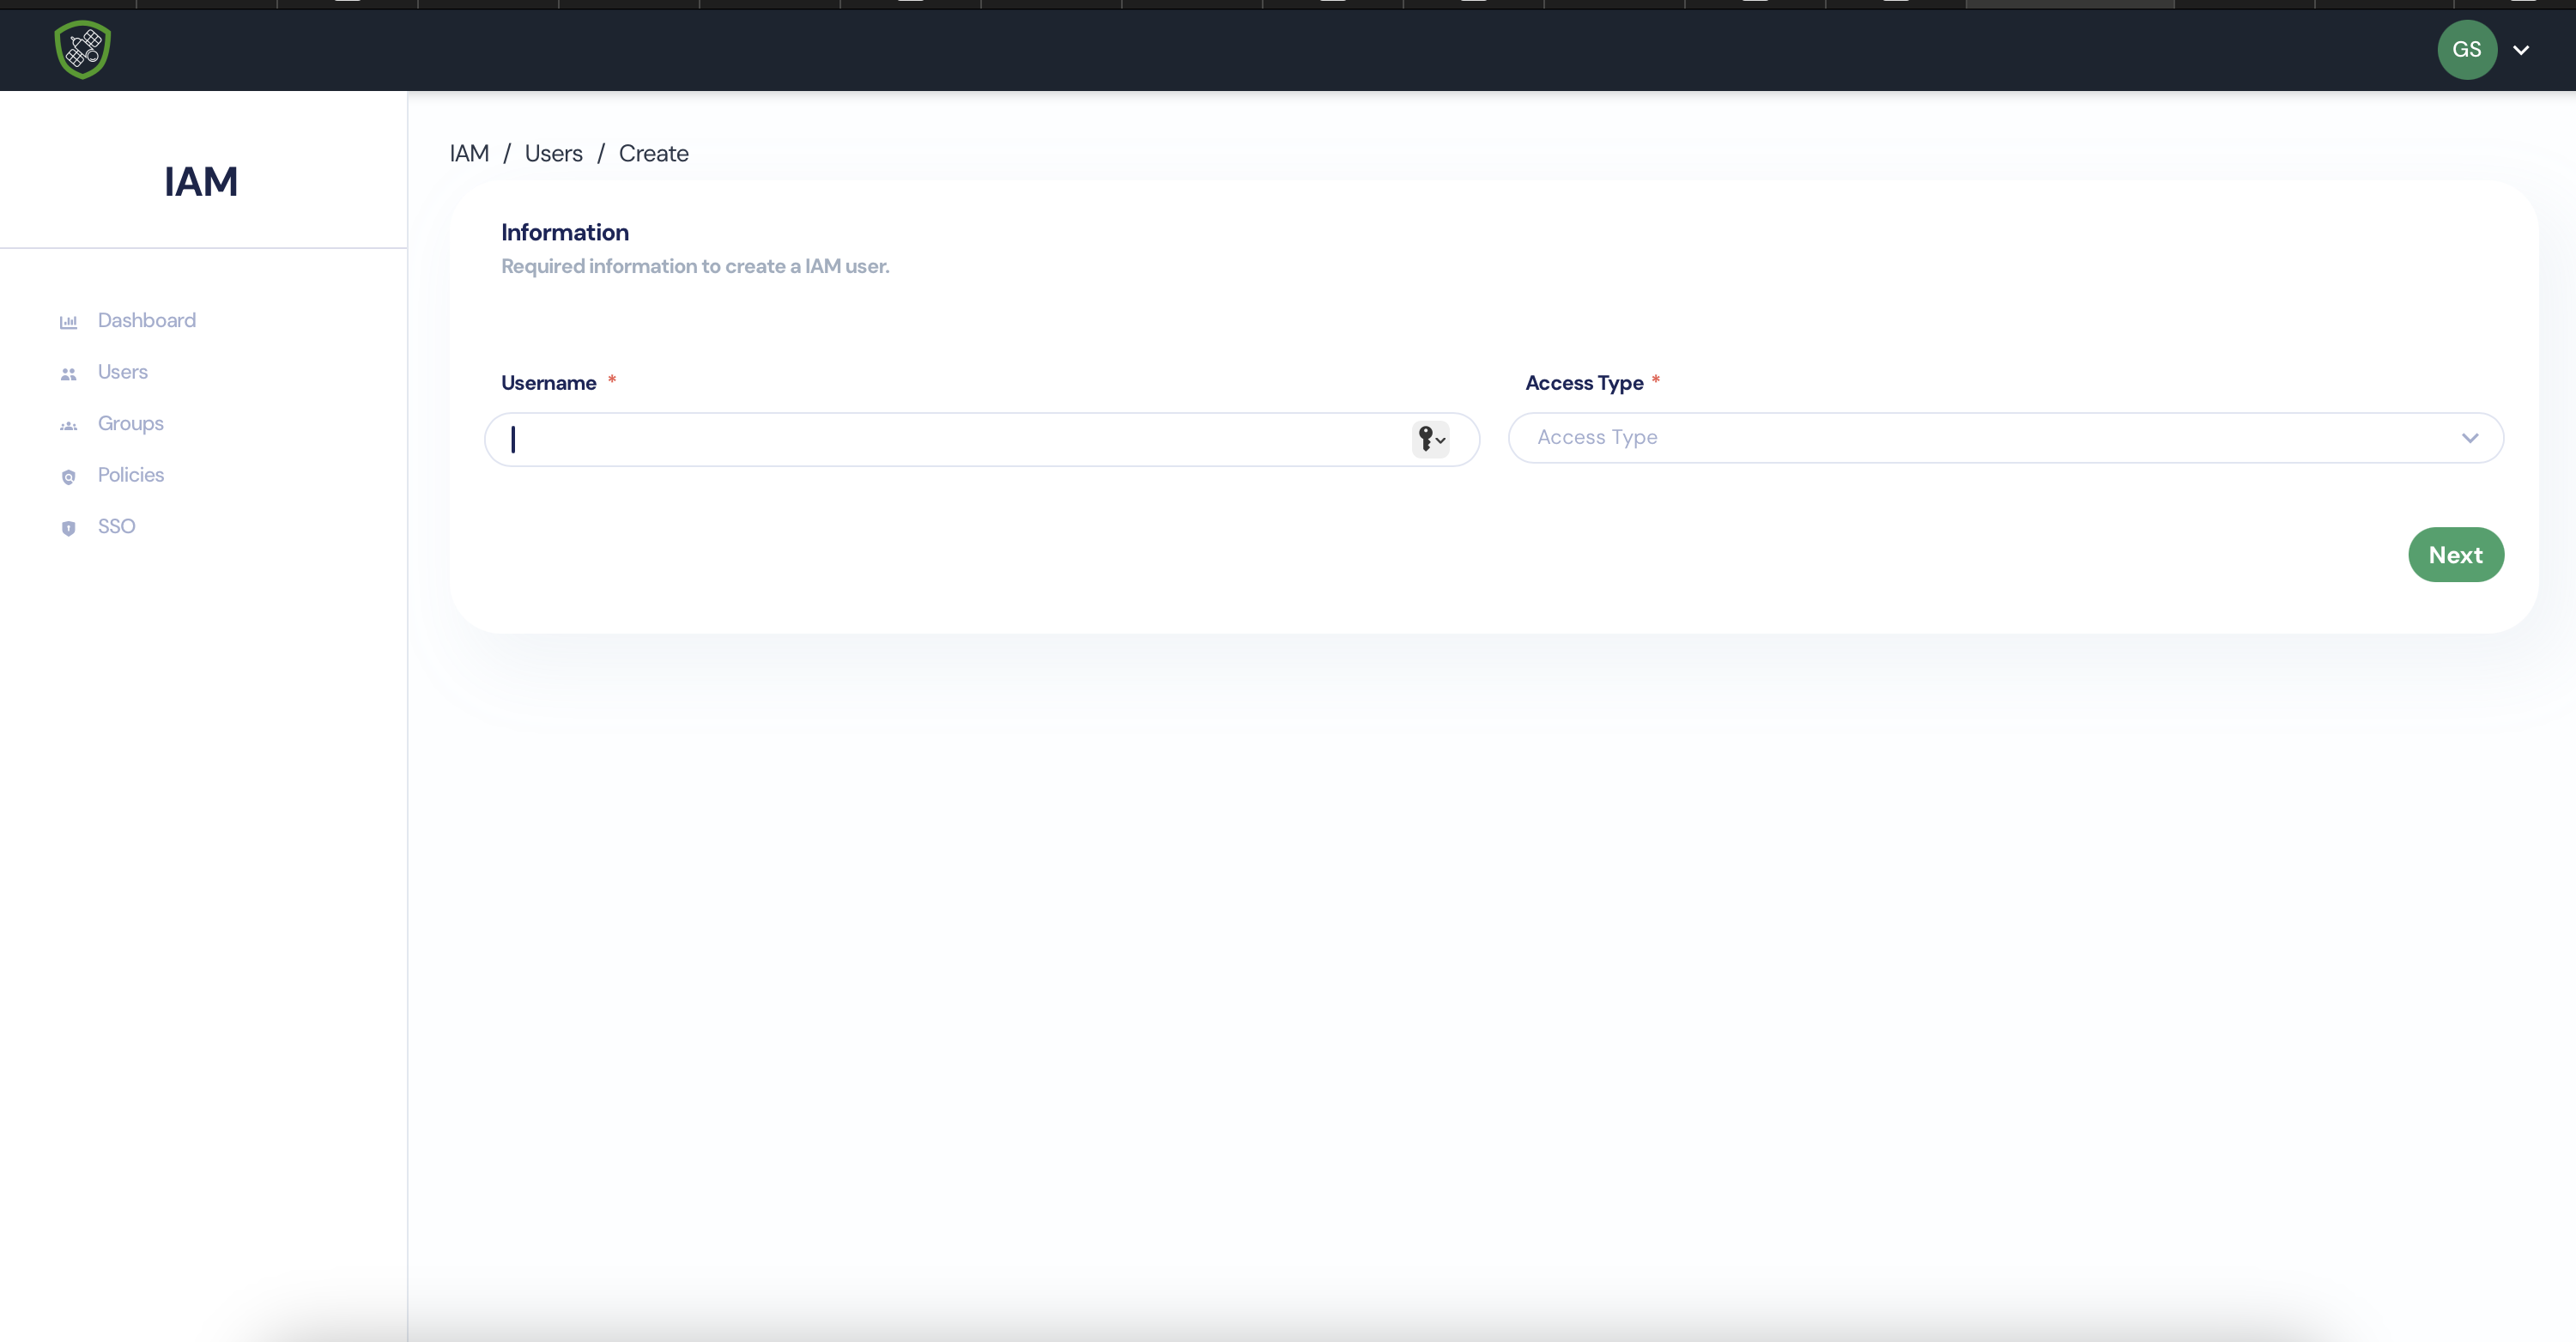
- Click on continue and add some more information about user

- Click on Create User.
Note: If you receive “Add User To Groups” click Continue for now. We will add it later
Setup SSO
Setup SSO
To configure SSO for Google, below is the required information:
Sign-in page URL: Sign-out page URL: Certificate: Change PAssword URL:
Detailed guidance and steps are as follows;
Configure the SSO profile
-
Sign in to your Google Admin console. Sign in using your administrator account(does not end in @gmail.com)
-
In the Admin console, go to Menu > Security > Overview.
-
In Third-party SSO profile for your organization, click Add SSO profile.
Tutorials
Create a User
It is very simple to add a new IAM user. In the dashboard, click on new user. Fill in the details for the user. Click on create.
For adding this user to a group and granting permissions, check next sections.
Create a Group and Attach a user to the group
To create a group, click on new group button. Give a name to the group. Write a description for the group. Attach permissions to the group or you can add them later. Click on create group, your group will be created with the necessary permissions.
API Reference
It describes all the API operations in detail. Along with that, it provides sample requests, responses and errors.
You can find the API Guide here
Developer Guide
It provides the detailed information about setting up and working with Sypher using the SDKs and API.
Coming soon….
Features
Create a User
It is very simple to add a new IAM user. In the dashboard, click on new user. Fill in the details for the user. Click on create.
For adding this user to a group and granting permissions, check next sections.
Create a Group and Attach a user to the group
To create a group, click on new group button. Give a name to the group. Write a description for the group. Attach permissions to the group or you can add them later. Click on create group, your group will be created with the necessary permissions.
Setup SSO
Created August 23, 2022
Setup SSO
To configure SSO for Google, below is the required information:
Sign-in page URL: Sign-out page URL: Certificate: Change PAssword URL:
Detailed guidance and steps are as follows;
Configure the SSO profile
-
Sign in to your Google Admin console. Sign in using your administrator account(does not end in @gmail.com)
-
In the Admin console, go to Menu > Security > Overview.
-
In Third-party SSO profile for your organization, click Add SSO profile.
-
Check the Set up SSO with third-party identity provider box. Fill in the following information for your IdP:
-
Enter the Sign-in page URL and Sign-out page URL for your IdP. Note: All URLs must be entered and must use HTTPS, for example https://sso.domain.com.
-
Click Upload certificate and locate and upload the X.509 certificate supplied by your IdP. For information on generating a certificate, see SAML key and verification certificate.
-
Choose whether to use a domain-specific issuer in the SAML request from Google. If you have multiple domains using SSO with your IdP, use a domain-specific issuer to identify the correct domain issuing the SAML request.
Checked Google sends an issuer specific to your domain: google.com/a/your_domain.com (where your_domain.com is your primary Google Workspace domain name)
Unchecked Google sends the standard issuer in the SAML request: google.com
-
(Optional) To apply SSO to a set of users within specific IP address ranges, enter a network mask. For more information see Network mapping results. Note: you can also set up partial SSO by assigning the SSO profile to specific organizational units or groups.
-
(Optional) Enter a change password URL for your IdP. Users will go to this URL (rather than the Google change password page) to reset their passwords. Note: If you enter a URL here, users are directed to this page even if you don’t enable SSO for your organization.
-
Turn off SSO for all Users
If you need to turn third-party authentication off for all your users without changing the SSO profile assignment for OUs or groups, you can disable the third-party SSO profile:
- Uncheck Set up SSO with third-party identity provider.
- Click Save.
Create an SSO profile
-
Sign in to your Google Admin console. Sign in using your administrator account (does not end in @gmail.com).
-
In the Admin console, go to Menu ““and then”” Securityand thenOverview.
-
Under Third-party SSO profiles, click Add SAML profile.
-
Enter a name for the profile.
-
Fill in the Sign-in page URL and other information obtained from your IdP.
-
Click Upload certificate, then locate and upload your certificate file. For information on generating a certificate, see SAML key and verification certificate.
-
Click Save.
-
In the SP Details section, copy and save the Entity ID and ACS URL. You’ll need these values to configure SSO with Google in your IdP admin control panel. Note: You can create a maximum of 1000 third-party SSO profiles.
Decide which users should use SSO
Turn SSP o for an OU or group by assigning an SSO profile and its associated IdP. Or, turn SSO off by assigning ‘None’ for the SSO profile. You can also apply a mixed SSO policy within an OU or group, for example turning SSO on for the OU as a whole, then turning it off for a sub-OU.
-
Click Manage SSO profile assignments.
-
If this is your first time assigning the SSO profile, click Get started. Otherwise, click Manage.
-
On the left, select the organizational unit or group to which you’re assigning the SSO profile.
- If the SSO profile assignment for an OU or group differs from your domain-wide profile assignment, an override warning appears when you select that OU or group.
- You can’t assign the SSO profile on a per-user basis. The Users view let you check the setting for a specific user.
-
Choose an SSO profile assignment for the selected OU or group:
- To exclude the OU or group from SSO, choose None. Users in the OU or group will sign in directly with Google.
- To assign another IdP to the OU or group, choose Another SSO profile, then select the SSO profile from the dropdown list.
-
(Microsoft OIDC SSO profile only) Enter your Microsoft account password and click Sign in to verify your Microsoft SSO configuration. If you’re an Azure AD organization admin, you have the option to accept consent on behalf of the organization. This means that end-users will not be prompted to provide OAuth consent.
-
Click Save.
-
Assign SSO profiles to other OUs or groups as needed. After you close the Manage SSO profile assignments card, you’ll see the updated assignments for OUs and groups in the Manage SSO profile assignments section.
Manage domain-specific service URLs
The Domain-specific service URLs setting lets you control what happens when users sign in using service URLs such as https://mail.google.com/a/yourdomain.com. There are two options:
-
Redirect users to the third-party IdP. Choose this option to always route these users to the third-party IdP that you select in the SSO profile drop-down list. This can be the SSO profile for your organization, or another third-party profile (if you’ve added one). Important: If you have organizational units or groups that are not using SSO, don’t choose this setting. Your non-SSO users will be automatically routed to the IdP and won’t be able to sign in.
-
Require users to enter their username on Google’s sign-in page. With this option, users entering domain-specific URLs are first sent to the Google sign-in page. If they are SSO users, they’re redirected to the IdP sign-in page.